Introduction to Unity ECS (Entity Component System) and Job System


Introduction
Update: ECS package updated to 0.0.12-preview.19
In this blog post we get our hands on Unity ECS (Entity Component System), Job System, and implement Conway’s Game of Life with three different approaches: classic, hybrid and pure ECS. This way you can have a concrete example with a smooth transition from the classic implementation to pure ECS.
In our examples, we took an implementation that doesn’t pretend to be optimized and will do the necessary changes to use ECS. The results where measured in the same hardware so the only variable is the logic.
Spoiler alert: ECS isn’t production ready yet and in the future there may be significant changes.
Conway’s Game of Life
We chose Conway’s Game of Life as an example because its simple but quite expensive to compute. Moreover, it differs from the most of ECS examples out there because each entity isn’t isolated, it actually needs to access other entities.
In the Game of Life, there’s a 2D board that the left edge is connected to the right one, also the top is connected to the bottom, yielding a toroidal topology.
Each cell can be alive or dead and its state is changed in each generation (simulation step) with the following rules:
- if the cell is alive and has one or none alive neighbors, it dies.
- if the cell is alive and has 2 or 3 alive neighbors, it survives.
- if the cell is alive and has 4 or more alive neighbors, it dies.
- if the cell is dead and has exactly 3 alive neighbors, it revives.
Even though the computations are extremely simple, in a 100x100 board we have 10.000 cells: their sum is quite something.
This simple rules create interesting patterns:

Classic approach
The classic approach consists of having a MonoBehaviour per cell, and each one computes its state accessing its neighbors state:
public class CellClassic : MonoBehaviour {
    bool AliveNow;               // Dead or alive (now)
    bool AliveNext;              // Dead or alive (next generation)
    List<CellClassic> Neighbors; // Always 8 neighbors

    void Update() {
        // Calculate AliveNext based on Neighbors[0..7].AliveNow
    }

    void LateUpdate() {
        AliveNow = AliveNext;
        // Update cell the material if needed
    }
}
And of course, the manager that creates the board:
public class BoardManagerClassic : MonoBehaviour {
    void Awake() {
        // Instantiate every cell prefab (100x100 in our example)
        // Set every cell's state (dead or alive)
        // Set every cell's neighbors
    }
}
This implementation gives us about 56 FPS.
ECS basic concepts
So far so good, nothing new. The previous implementation is what we are used to. However, there are 3 main issues with the classic approach that end in poor performance:
- Because each cell is a MonoBehaviour, their memory is dispersed, resulting lots of cache misses.
- We are allocating memory we probably don’t need (MonoBehaviour, Transform, GameObject, etc.).
- All the cells are processed in the main thread, wasting the other CPU cores.
This is where ECS makes its great entrance: it is or leads to the solution of this issues.
ECS stands for Entity Component System:
- Entity: Literally an integer index. They group components logically.
- Component: Just a group data without behaviour.
- System: They operate on groups of components to add functionality.
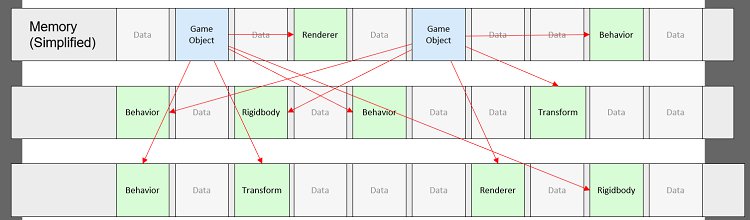
In ECS, the data and the behaviour are decoupled by design. In a MonoBehaviour we have both data and behaviour, and they are attached to a GameObject.
An archtype is a set of component types. All the entities that have the exactly the same component types have the same archetype. Internally, Unity stores the components of the same archetype in the same chunks of 64k and since it knows the memory layout, the components are stored linearly. And as you guessed it, this is cache friendly and super performant.
We may have the same component type belonging to different archetypes, or exceed the chunk capacity, so not all components exist in the same array. That’s why it is said that Unity systems operate on streams of components instead of arrays. However in practice, we use them like arrays (Unity does all the heavy lifting for us and gives us an array like interface), to the point the term array and stream are used indistinctly even in their API.
Official info about Unity ECS can be found in the GitHub repo here.
Hybrid Approach
In the hybrid approach we still use MonoBehaviour but for data only and the behavior is moved to actual systems. This lets us use the standard MonoBehaviour with ECS being a great way to transition to ECS from an existing codebase.
In order to use standard MonoBehaviour with ECS we need to attach a GameObjectEntity component to that GameObject.
Going back to Conway’s Game of Life, we define our two components. CellStateH containing the state of the cell and NeighborsH the states of the neighbors of a cell. They could be the same component as they are both state of the same cell, but we are separating them to show you how to work with several components.
public class CellStateH : MonoBehaviour {
    public bool AliveNow;  // Dead or alive (now)
}

public class NeighborsH : MonoBehaviour {
    public List<NeighborsH> NList; // Always 8 neighbors
    public int AliveNeighbors = 0;
}
Our first system UpdateNeighborsSystemH, operates on both components. For each cell, if it is alive, increments the AliveNeighbors counter for each neighbor.
public class UpdateNeighborsSystemH : ComponentSystem {
    public struct NeighborsData {
        public readonly int Length;
        [ReadOnly] public ComponentArray<CellStateH> States;
        public ComponentArray<NeighborsH> Neighbors;
    }
    [Inject] NeighborsData m_neighbors;

    protected override void OnUpdate() {
        for (int i = 0; i < m_neighbors.Length; ++i) {
            if (m_neighbors.States[i].AliveNow) {
                List<NeighborsH> neighbors = m_neighbors.Neighbors[i].NList;
                for (int nIndex = 0; nIndex < neighbors.Count; ++nIndex) {
                    neighbors[nIndex].AliveNeighbors++;
                }
            }
        }
    }
}
The [Inject] attribute is a shortcut to get the stream of components we declared on the struct NeighborsData. Each component array has the same length and is stored in the Length struct’s attribute. Additionally, you can get them via an API. Also note the [ReadOnly] attribute. This is useful to Unity, in order to do optimizations. You can even specify [WriteOnly].
The second system, UpdateNeighborsSystemH, calculates the next generation based on each cell neighbor states and reset the AliveNeighbors counter for each cell:
[UpdateAfter(typeof(UpdateNeighborsSystemH))]
public class CalcNextGenSystemH : ComponentSystem {
    public struct CellData {
        public readonly int Length;
        public ComponentArray<CellStateH> States;
        [ReadOnly] public ComponentArray<NeighborsH> Neighbors;
    }
    [Inject] CellData m_cellData;

    protected override void OnUpdate() {
        for( int i = 0; i < m_cellData.Length; ++i) {
            // Calculate <AliveNext> based on Neighbors[i].AliveNeighbors
            m_cellData.States[i].AliveNow = <AliveNext>;
            m_cellData.Neighbors[i].AliveNeighbors = 0; // Reset counter
        }
    }
}
And of course the highly anticipated manager:
public class BoardManagerHibrid : MonoBehaviour {
    void Awake() {
        // Instantiate every cell prefab (has GameObjectEntity )
        // Set every cell's state (dead or alive)
        // Set every cell's neighbors
    }

    void Update() {
        // Update every cell material based on it's state
    }
}
With this implementation we got about 72 FPS. About 16 FPS better than the classic approach. Not bad.
Job System
Before starting with pure ECS, is a good idea to briefly introduce the Unity Job System. ECS and Job System are two different beasts and can be used separately. However ECS is designed to work extremely well with the Job System. Note that even though at the time of writing ECS is not production ready yet, the Job System already is.
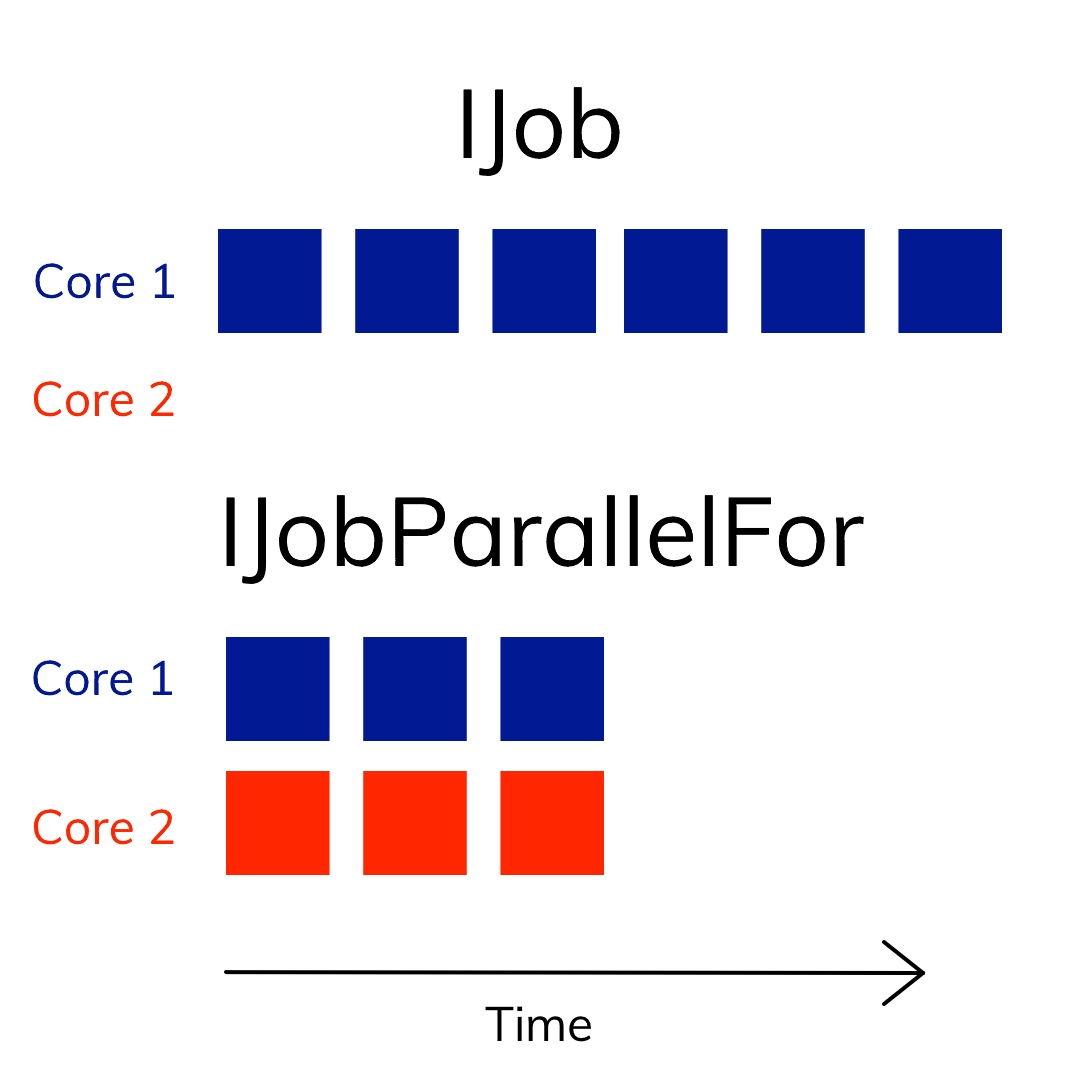
The Job System takes units of work called Jobs and run them in parallel and concurrently in the working threads. It creates a working thread per CPU core to avoid context switching. When the main thread is idle, Unity may use it to run jobs.
It avoids race conditions automatically because the jobs operate on a copy of the data only and cannot access static members. Jobs work only with blittable types.
To get the results from jobs Unity provides native containers like NativeArray, NativeHashMap, etc. that can be read and written in jobs. These containers have to be disposed manually but Unity keeps track of them. Also Unity checks for race conditions if you are accessing them concurrently. This checks can be deactivated with [NativeDisableContainerSafetyRestriction] if you are sure your algorithm doesn’t cause race conditions by design. The attributes [ReadOnly] and [WriteOnly] can also be used here.
The order of execution of jobs is not guaranteed unless there are dependencies between sets of jobs that are declared programmatically.
The two basic types of jobs are IJob and IJobParallelFor. IJob represents a job that is executed in a single core. IJobParallelFor distributes the elements it operates on in all the working threads. So if we have 6 elements and two cores, Unity will run 3 elemens in one core and the remaining 3 in other core.
Why not not use multithreading instead?
- In video game development is usual to have plenty of small unrelated tasks and having lots of threads of even a thread pool is not a good idea because of the context switching performance hit.
- You need to handle the race conditions manually and if you have programmed multithreading applications you know is a pain to maintain and debug.
- Unity already uses the Job System internally and your owns threads will compete with the Unity threads.
However there are some gotchas:
- You can’t interrupt a Job after it started running
- They aren’t the best solution to handle I/O since the working thread will be blocked when waiting for I/O (and remember we have only one thread per core).
For more info, check the Job System documentation.
Burst Compiler
Jobs can be dramatically optimized using the Burst Compiler (WARNING!! not production ready and only works at the editor at the time of writing). On our side is just a matter of installing it with the Package Manager, enabling it in the editor and using the attribute [BurstCompile]. Also we can only use a subset of C# but is a reasonably one and most of it already imposed by the Job System.
Check out the Burst Compiler documentation for more detailed information.
Pure ECS Approach
Pure ECS means we don’t use GameObject or MonoBehaviour at all. In order to do so, we define our ECS components in structs that implement the IComponentData interface. They have only data with blittable types.
JobComponentSystem let’s us use systems with the Jobs and manage their dependencies automatically for us and IJobProcessComponentData is a special type of Job that operates on IComponentData arrays, and even though it isn’t mandatory, you might find it quite useful.
Right now there isn’t a way (at least built-in) to store a fixed array in component. It used to be a FixedArray but it was recently removed and replaced by DynamicBuffer in version 0.0.10.
In our pure ECS solution to Conway’s Game of Life, we decided to use a single NativeArray (neighboursState) storing all the neighbors state so the first 8 elements are the neighbors of the first cell, the second 8 elements are the neighbors of the second cell and so on.
We have a single component with the cell state (unfortunately, bool isn’t blittable, we used a byte instead):
public struct CellStateP: IComponentData {
    public byte AliveNow;  // (bool) Dead or alive (now)
    public byte AliveNext; // (bool) Dead or alive (next generation)
    public int CellIndex;  // Internal Index
}
The following Job that computes the next state based on the neighbors state (note the [BurstCompile] and [ReadOnly] attributes we talked about earlier):
[Unity.Burst.BurstCompile]
public struct CalculateNextGenJobP : IJobProcessComponentData<CellStateP> {
    [ReadOnly] public NativeArray<byte> neighboursState;
    public void Execute(ref CellStateP state) {
        // Calculate state.AliveNext using neighboursState
    }
}
And our first system that schedules the that job, creates and destroy the neighbors array (this array is calculated in another system):
public class CalcNextGenSystemP : JobComponentSystem {
    public NativeArray<byte> nState;  // neighbours State

    protected override void OnCreateManager() {
        nState = new NativeArray<byte>(8 * [CellsCount], Allocator.Persistent);
    }

    protected override void OnDestroyManager() {
        nState.Dispose();
    }

    protected override JobHandle OnUpdate(JobHandle inputDeps) {
        var nextGenJob = new CalculateNextGenJobP {neighboursState = nState};
        return nextGenJob.Schedule(this, inputDeps);
    }
}
Our second job moves each cell to its next state, and in this step also updates the neighbors array (neighboursState). For each cell, we precalculate the indexes of that cell in the neighbors array (a cell is a neighbor of 8 cells, so its state appears 8 times in different locations of the neighboursState):
[Unity.Burst.BurstCompile]
struct MoveNextGenJobP : IJobProcessComponentData<CellStateP> {
    [NativeDisableContainerSafetyRestriction]
    public NativeArray<byte> neighboursState;

    [ReadOnly]
    public NativeArray<int> neighboursIndexes; // indexes of each cell's neighbours

    public void Execute(ref CellStateP state) {
        state.AliveNow = state.AliveNext;

        int startIndex = state.CellIndex * 8;
        for (int i = startIndex; i < startIndex + 8; ++i) {
            neighboursState[neighbours[i]] = state.AliveNow;
        }
    }
}
The second system, creates the neighbours index array (neighboursIndexes, as mentioned in the job) and schedules the job. Here is interesting to see that we can inject a system into another system. In this case, we inject the CalcNextGenSystemP so we can access the neighbor state array. Also note the [UpdateAfter] attribute to ensure the order of execution. This means that the first job of MoveNextGenSystemP will execute after all the jobs of CalcNextGenSystemP are completed
[UpdateAfter(typeof(CalcNextGenSystemP))]
public class MoveNextGenSystemP : JobComponentSystem {
    public NativeArray<int> neighboursIndexes;
    [Inject] CalcNextGenSystemP calcNextGenSystem;

    protected override void OnCreateManager(){
        neighboursIndexes = new NativeArray<int>(8 * [CellsCount], Allocator.Persistent);
        // Initialize neighboursIndexes with the right indexes
    }

    protected override void OnDestroyManager(){
        neighboursIndexes.Dispose();
    }

    protected override JobHandle OnUpdate(JobHandle inputDeps){
        MoveNextGenJobP moveNextGenJob = new MoveNextGenJobP{
            neighboursState = calcNextGenSystem.neighboursState,
            neighboursIndexes = neighboursIndexes
        };
        return moveNextGenJob.Schedule(this, inputDeps);
    }
}
Great, now we have to render all that stuff but we don’t have GameObject or Renderer. Fortunatelly Unity has a system that operates on entities that have at least one component that defines a transform (Position, Rotation or Scale) and a MeshInstanceRenderer component. This system renders meshes with GPU instancing. You can easily write your own system to render meshes without GPU instancing, here is an example.
Our last system, updates the cell material based on the cell state (we know there are better alternatives but this one is illustrative and similar to the previous approaches, so they can be comparable). MeshInstanceRenderer is a ISharedComponentData instead of a IComponontData, a special type of component that is shared by several entities. For this reason it modifies the chunk where its entity’s components are stored. So updating a entity shared component will result in moving that entity’s components to another chunk (that’s one of the reasons why this solution to rendering in this example is far from optimal). ISharedComponentData allows managed objects like Material instances as attributes.
Another important concept is the EntityCommandBuffer. We cannot modify entities when iterating over them as it breaks the streams. And inside a job we can’t access the EntityManager (facade to modify entities). But we can schedule that kind of operations to be executed in the main thread using a EntityCommandBuffer. Each system has one, in this case the PostUpdateCommands. But we could share the same command buffer between multiple systems, using a barrier which is a system (BarrierSystem) that serves as a synchronization point between systems sharing its command buffer or when declaring the execution order explicitly with [UpdateAfter] or [UpdateBefore].
In this system we also get the components via the EntityManager using a ComponentGroup instead of injecting them as the previous examples.
[UpdateAfter(typeof(MoveNextGenJob))]
public class CellRenderSystemP : ComponentSystem {
    private ComponentGroup group;

    protected override void OnCreateManager() {
        group = GetComponentGroup(typeof(CellStateP),typeof(MeshInstanceRenderer));
    }

    protected override void OnUpdate() {
        var entityArray = group.GetEntityArray();
        var cellStates = group.GetComponentDataArray<CellStateP>();
        var mirs = group.GetSharedComponentDataArray<MeshInstanceRenderer>();

        for (int i = 0; i < cellStates.Length; ++i) {
            // IF needs to update the cell material, setup <new MeshInstanceRenderer> based on mirs[i] and cellStates[i]
            PostUpdateCommands.SetSharedComponent<MeshInstanceRenderer>(entityArray[i], <new MeshInstanceRenderer>);
        }
    }
}
And finally we create all the entities programmatically using the EntityManager:
public class BoardManagerP : MonoBehaviour {
    void Awake() {
        var entityManager = World.Active.GetOrCreateManager<EntityManager>();

        MeshInstanceRenderer defaultMeshInstanceRenderer = new MeshInstanceRenderer{ ... };

        var cellArchetype = entityManager.CreateArchetype(typeof(Position), typeof(Rotation), typeof(CellState), typeof(MeshInstanceRenderer));

        <for each cell> {
            Entity cellEntity = entityManager.CreateEntity(cellArchetype);
            entityManager.SetComponentData<Position>(cellEntity, new Position { ... });
            entityManager.SetComponentData<Rotation>(cellEntity, new Rotation { ... });
            entityManager.SetComponentData<CellState>(cellEntity, new CellState { ... });
            entityManager.SetSharedComponentData<MeshInstanceRenderer>(cellEntity,defaultMeshInstanceRenderer);
        }
    }
}
With this approach we got about 225 FPS, against 72 FPS (hybrid) and 56 FPS (classic).
Conclusions
Just using the hybrid approach we can see some performance improvements, but the real boost was achieved with the pure ECS with Jobs, getting close to 2x.
In this example the computation is fairly simple but the performance boost was surprisingly remarkable. We can’t wait ECS to be production ready.
We hope you find this useful and let as know your thoughts below in the comment section or reaching us directly.